
Do you know have an off-grid solar system with battery backup? Have you ever wondered about the battery state of charge? Do you want to monitor how much energy went into or has been taken out of these batteries? Would knowing the battery’s health help you plan for their replacement one day?
There are times when you should know the state of charge on your battery or battery bank. All batteries are expensive and keeping them operating at their peak potential is an important part of prolonging their life expectancy. They need to be monitored to ensure they are being fully charged or so that you know how much energy is remaining. Victron Energy IP21 Manuel states it this way: “Batteries are used in a wide variety of applications, mostly to store energy for later use. But how much energy is stored in the battery? No one can tell by just looking at it. The service life of batteries depends on many factors. Battery life may be shortened by under-charging, over-charging, excessively deep discharges, excessive charge or discharge currents, and by high ambient temperature. Monitoring the battery with a battery monitor will give important feedback to the user so that remedial measures can be taken when necessary. Doing this will extend battery life and the battery monitor will quickly pay for itself.”
Victron Energy Products
A word about Victron. Over the past few years, our team has been gaining a great deal of experience with the Victron product line. We have purchased a variety of their equipment and are putting it through its paces. We can recommend it to our colleagues serving in various parts of the world. A Victron dealer usually isn’t very far away, their products are not overly expensive and will get the job done.
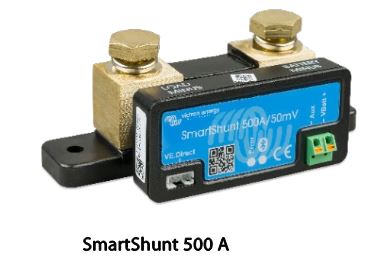
The IP21 Smart Battery Shunt with a Cerbo GX (see below) communications hub from Victron energy just might be what you need! This battery shunt will monitor all the energy coming into and going out of the battery so you can better manage your loads, know whether your PV system is up to the task, or if your batteries are approaching the end of their life. It will indicate this information to you as a battery “State of Charge” (SoC). These shunts will work with all battery chemistries.
The Victron energy smart battery shunt is a battery monitor and can be added to any battery solar system. It monitors battery voltage, amperage in and out, and a calculated battery state of charge (%). It works with any battery setup from 12V to 48V (70V is the upper limit). It uses your phone, tablet or computer as the display. The smart shunt uses Bluetooth with the VictronConnnect app to communicate with your device. However, Bluetooth has a limited range, so you will need to be in the immediate area to take advantage of this method.
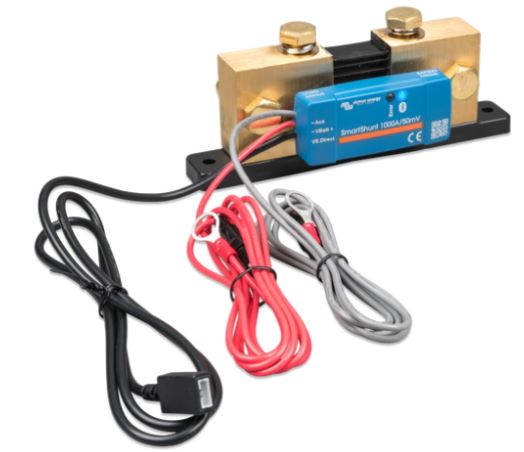
The SmartShunt comes in two models IP21 (500A/50mV PN SHU050150050) and IP65 (500A/50mV PN SHU065150050) with three sizes (current ratings): 500A, 1000A and 2000A. For indoor locations that are dry and not exposed to moisture, the IP21 would be a good choice. However, the IP65 is water resistant and instead of a plug terminal, it has a wiring pigtail so the shunt is sealed. The IP65 would be ideal (and better choice) for all locations especially in damp/wet (outdoor) dusty or humid environments. For use with the Cerbo, you will also need the VE.Direct cable which comes in several lengths between 0.3 and 10 m. Generally the 0.9m cable (ASS030530209) will fit most installations.
Why do I need a Shunt?
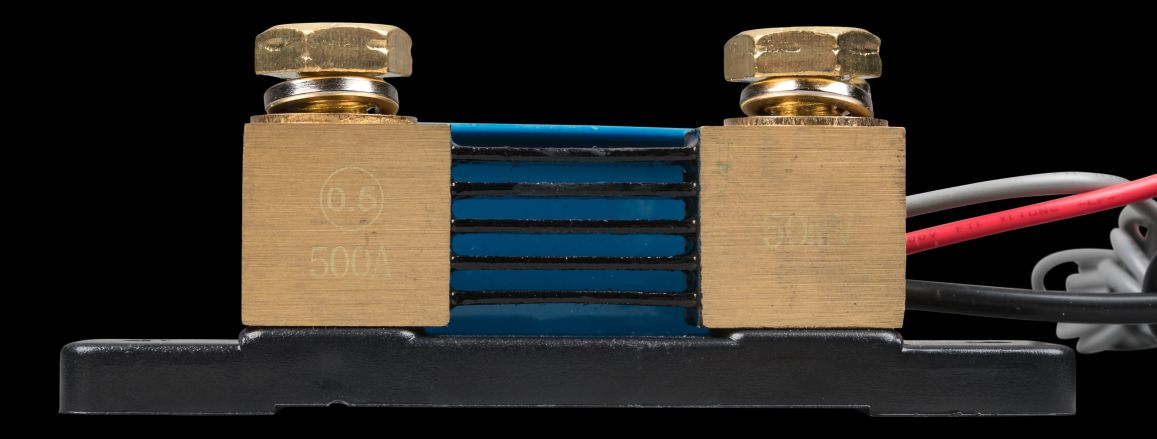
Simply put, a shut in a conductive bar that is “calibrated” to have a specific DC voltage drop across its length for a specific range of DC current flow. In order to get a current measurement through the shunt, you would take a voltage measurement – typically in the milli-volt range. When the shut has been correctly “calibrated”, this mill-volt reading would directly correspond to current (amps). The Victron Smart shunt does all this for you and more.
There are two ways to view the information collected by the Smart shunt.
As mentioned earlier, the smart shunt includes Bluetooth connectivity.
By connecting your device (smart phone, tablet or computer) while using the VictronConnnect app to the SmartShunt, you can see the battery parameters being monitored. The shunt can also monitor the mid-point voltage of your battery bank giving you an extra data point to know the health of the whole battery bank. And finally, with an optional temperature sensor, the smart shunt can help optimize the charging stages based upon the temperature of the battery bank. Victron’s SmartShunt can also send this information to the Cerbo GX using the VE.Direct cable.
Remote monitoring?
With an internet connect at the installation site, you can monitor your system remotely by taking advantage of the Victron Cerbo-S GX or Cerbo GX device. These GX devices upload the information to the VRM (Victron Remote Monitoring) website. When the GX device is connected to the SmartShunt via a VE.Direct cable the Cerbo GX uploads this data to your installations homepage on the VRM. From there, the information is displayed and can be shared with team members or technicians who may assist with your maintenance.
Helpful terms to know:
VictronConnect App -This is a free app for your smart phone, tablet or computer. It can be downloaded from either the Google Play store, Apple store or from Victron’s website. It is used to connect with Victron product either with Bluetooth (smart) or on the VRM.
VRM -Victron Remote Monitoring. This is the free website (setting up an account required) to remotely view and control an installation using the Victron line of products. Download this from Victron’s website.
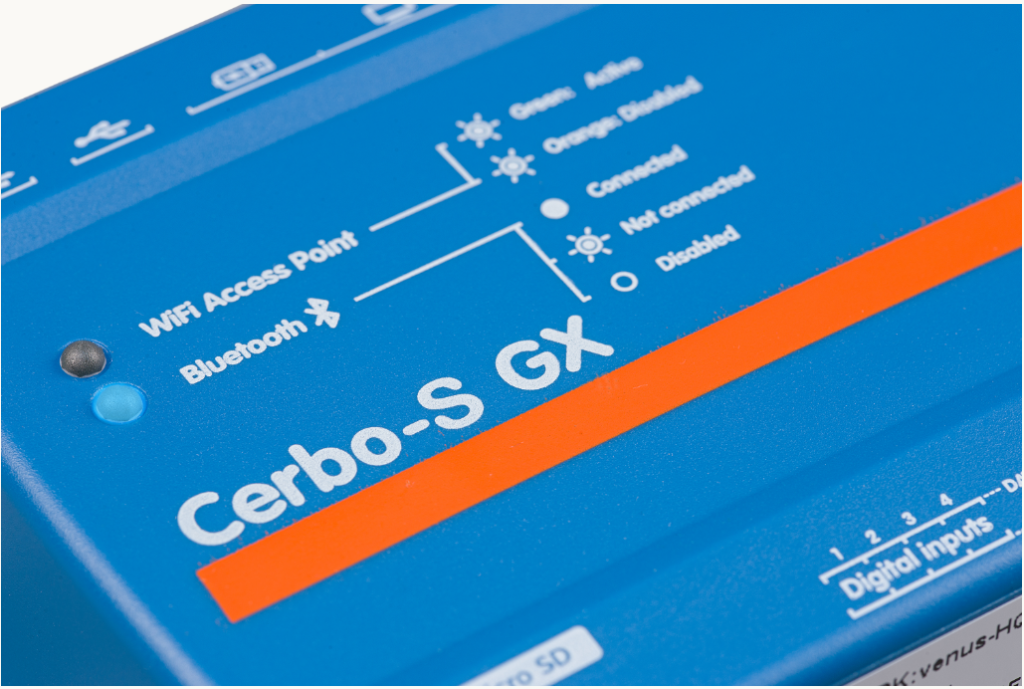
What is the Cerbo GX / Cerbo-S GX?
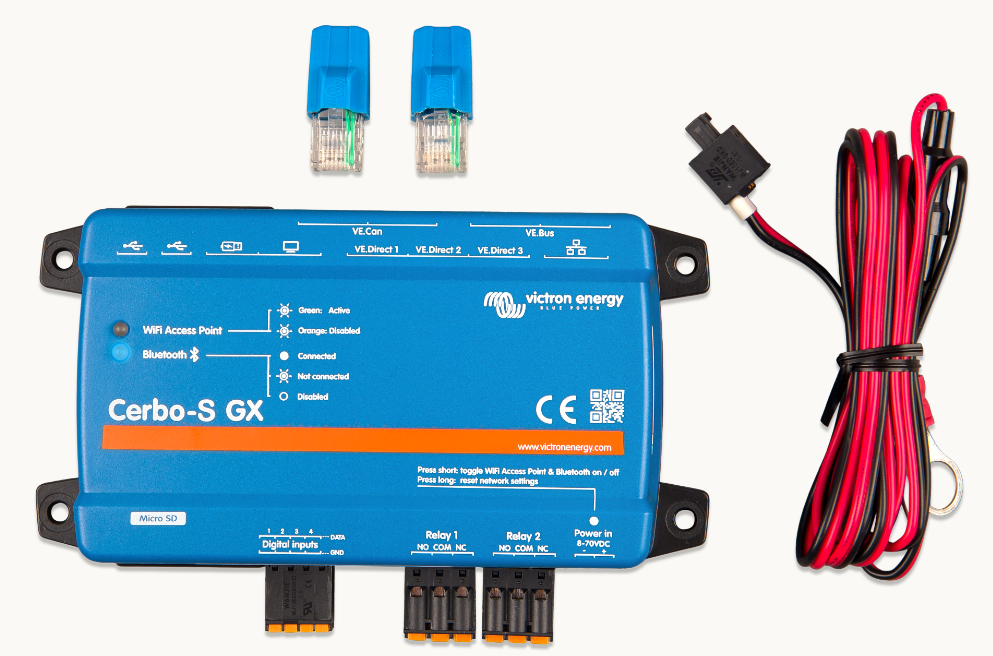
The Cerbo GX is a communications hub that allows you to remotely monitor your system data on the VRM. Additionally, you also have the ability to more remote setting changes to Victron equipment interfaced with the Cerbo GX. As a Victron product, it works seamlessly with all of their products. It can can take individual inputs from multiple sources such as Inverters, MPPT charger controllers, as well as monitor fuel/water tanks. The Cerbo also has two relays that can be configured to start a generator or other functions.
As mentioned above, there are two models available for the Cerbo GX. The Cerbo-GX (BPP900450100) includes all the same inputs as the Cerbo-S, but with additional inputs for managed lithium batteries using the BMS-Can bus and tank and temperature inputs. The Cerbo-S GX (BPP900450120) is available without the BMS-Can, tank or temperature inputs, but with all the other functionality at a lower cost.
An internet connection is required for the Cerbo GX to report its data to the VRM. For sites without internet or limited internet service a GSM modem can be used. In their product line, Victron offers a GX LTE 4G cellular modem for “GX” products if a good cellular signal is available at your site. There are multiple models, so refer to the manual and product information to see which model best matches the available cellular network bands in your area. The YouTube video “Connecting a Victron GX Device” will give further details about ways to connect the Cerbo to the Internet. The GX LTE 4G modem uses 2.5W when transmitting and less than 1 W when idle.
For sites with limited bandwidth or expensive service, the upload times can be adjusted between one minute to once/day (with many options in between). The more often the Cerbo sends updates, the better the VRM data resolution, which might help with troubleshooting. These reporting intervals, can be changed remotely via the Cerbo GX, so once the system is functional, only periodic (hourly, daily) reports would be necessary.
Installing the shunt
In order for the shunt to display correctly, it needs to be installed with the correct polarity. Not to worry, it is well documented and labeled which terminal of the shunt is connected to the Battery Negative, and the other shunt terminal will be to all the loads (down stream). Ideally, you will want to keep the jumper cable between the shunt and battery as short as practical. It should also be sized the same as or larger than the existing battery cables. Any losses from an undersized cable or excessively long (resistance) causes your system to be less efficient.
The Shunt will require one set of wires (included ) between the battery positive to the “Vbatt +” terminal. This will give power for the shunts circuitry. At this point, you can connect the VE.Direct cable between the shunt and the Cerbo GX.
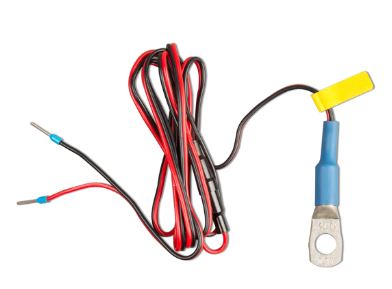
If you wanted to monitor the midpoint voltage OR the battery temperature of your battery bank, you would use the AUX terminal input. The shunt comes with two fused conductors for its VBatt + power input and the AUX input. To measure the battery temperature, a temperature sensor (ASS000100000, ~€ 33,00) would need to be purchased separately.
Installing the Cerbo GX / Cerbo-S GX
Installing the Cerbo GX/ Cerbo-S GX is quite easy. If you have every installed a network router, it is vary similar. The Cerbo GX requires a DC voltage between 8 – 70 Volts which you can get directly from your battery bank, so it would generally work on any small to mid sized solar system. It comes with its own inline 3.15A slow blow fuse. Once the power is connected, you would connect the VE.Direct cable between the Smart Shunt and the Cerbo GX. The VE.Direct cable only fits into the correct plug sockets, so it would be difficult to get this wrong. Lastly, can connect the Cerbo GX to your existing WiFi router or through a LAN cable from the Cerbo GX to your Router. In this case, it is best to use a Ethernet cable with manufactured ends to avoid any connectivity issues. One of the first things you must do is to update the Cerbo firmware, if the Cerbo has an internet connection (Ethernet or Wifi), go to Online updates. We would suggest that you do not select auto updates. Next, set the date, time and the time zone.
To ensure your Cerbo GX device operating properly is to configure the desired parameters, see the detailed list of all the settings within the Cerbo GX in the Manual under chapter 8. Carefully read through all the steps in the manual first, decide which settings you feel are important. There are some default settings you may want to uncheck, such as audible alarm, unless you want to hear a beeping sound when there has been a fault. If you plan to use the VRM, you will need to enable the VRM setting. If using the VRM, you will want to get this system a “name”, this is helpful if others will be assisting you who might also be monitoring other systems. For the AC Inputs 1 & 2, set those as to whether there is grid power and/or a generator connected. Monitoring grid failure would send an alarm when the grid power drops. If other devices are using DC power from your batteries (HF Radio, etc.), you would want to enable “Has a DC system”.
The best approach as mentioned above is to completely read through all the parameters and decide which ones interest you. If you have questions, review the content in the Manual, it will likely answer your questions. Make notes along the way, then go into the Cerbo GX to make these parameter changes, carefully navigating its vast menus.
Using the VRM
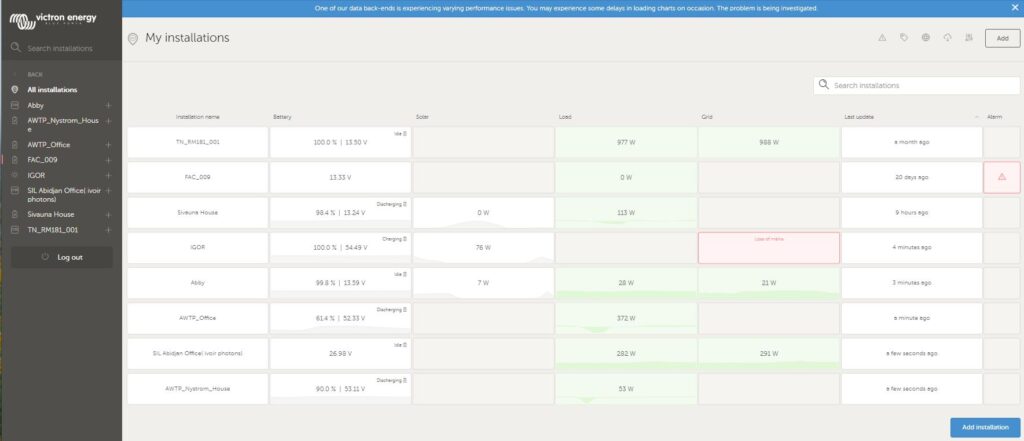
The VRM is where all the interface with the Cerbo GX and your system monitoring takes place. It is free portal, you would only need to create your own account with Victron. Once created, the Cerbo GX is linked to your account, the Cerbo-S GX will begin uploading data to your homepage. You can customize what and how the information is displayed.
As was mentioned earlier, you may also invite others to monitor your system, but they will have to create their own VRM account. As the site owner, you can limit what others can do on your system and lock down some parameters so they are not accidently changed.
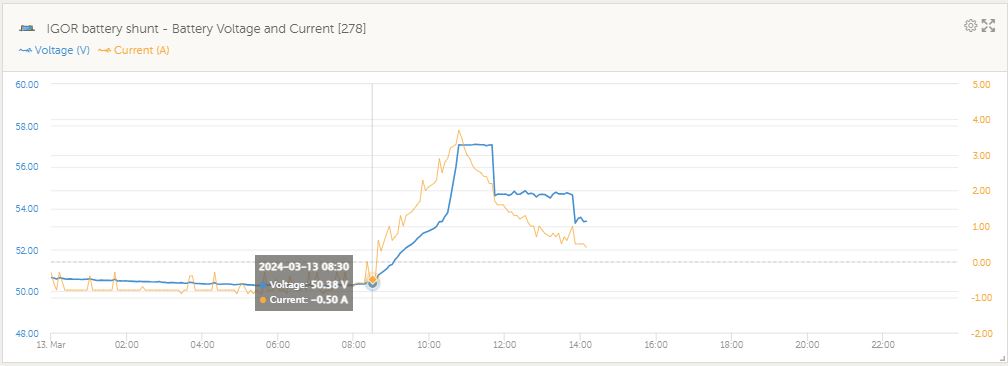
Using the “Remote Console” on your installations homepage, you have remote access into the Cerbo GX. From there, you can see each of the Victron components that are actively communicating with the Cerbo GX. Within the Cerbo itself, you would also have access into the settings of the Cerbo GX, allowing you to change some of the parameters such as its reporting interval, update firmware, set date & time, etc. You can also view the data from the shunt both real time and historical. In addition, you can also make some set up changes, see the temperature of the battery (provided you are using the optional temperature sensor).
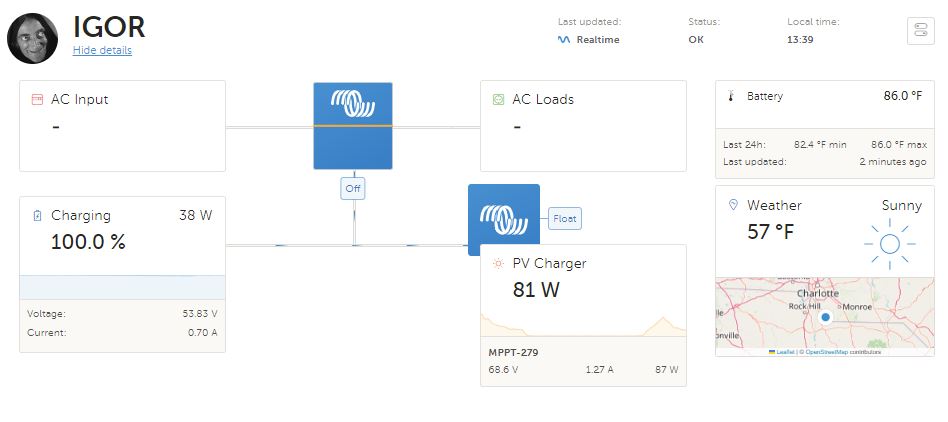
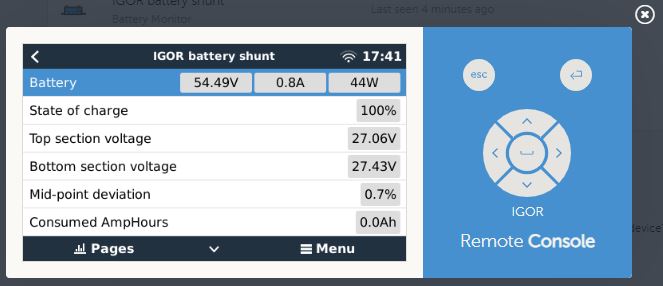
Each piece of Victron equipment (Inverter/charger, MTTP Charger controller, Smart Shunt, temperature sensor, etc.) adds more information that is available on the VRM for monitoring. It is essentially “plug & play” you simply add the new device by connecting it to the Cerbo-S GX and you are done. The image above is the homepage display for an Outback system with Victron Smart Shunt, MPPT charge controller and Cerbo GX. Below is a screen shot of the Smart Shunt as viewed from within the remote console.
To learn more or to get recommendations for other Victron Energy products, email power.systems@sil.org. If you are consulting with GTIS and would like assistance with monitoring, our team could be added to your VRM account.