To build your battery bank you need to decide two things.
- The watt-hour capacity you need
- The voltage of your battery bank
Watt-Hour capacity
Your batteries need to hold enough energy to keep you running overnight plus through a couple cloudy days. Our rule of thumb is to size your battery bank to have a usable capacity 3 times your daily watt-hour needs. See the Calculating Loads page for determining the daily watt-hours you need. For AGM (or other lead-acid) batteries you should have a Low Voltage Disconnect set to prevent them from ever discharging below 50%; making their usable capacity half of what it says on them! So for AGM batteries size for your daily watt-hours x 6, For LFP batteries watt-hours x 3.5. Don’t go smaller than this unless you know you’ll mostly be needing power during the daytime and you can do without during cloudy periods.

You can see if your battery will be big enough by simulating your system in our Online Test Drive tool. On the “Choose a System” page, click the “Advanced” button after choosing any of our pre-packaged systems and start overriding the design limits. You can change battery type, (LFP or AGM) battery voltage and amp-hours and solar panel size and numbers. Using the Online Test Drive you can see the performance effect of changing the number of batteries or solar panels.
Voltage
The voltage of you battery bank will be determined by your choice of inverter and charge controller. While large MPPT charge controllers can usually charge any voltage battery, most inverters are usable for only one particular voltage; either 12V, 24V or 48V. If you need an inverter of 2000W or larger we recommend you find an inverter built for 48V DC, even if this isn’t easy to get locally. See “Why 48V is Better” below for the reasons why.
Connecting batteries in series raises the voltage
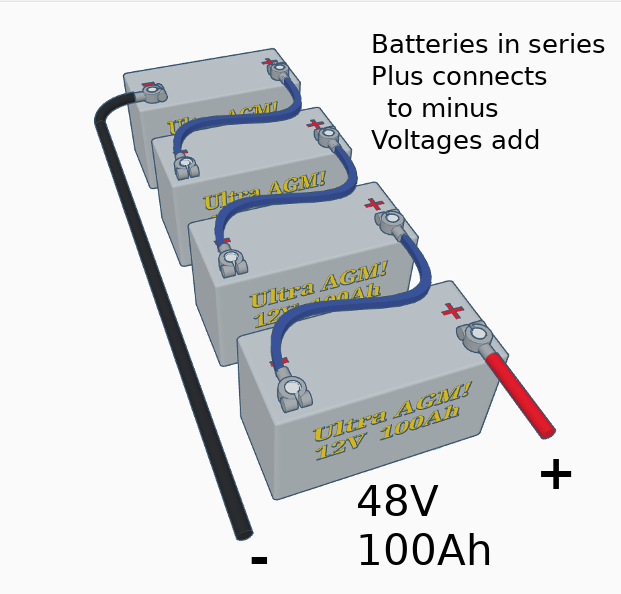
You build up voltage by putting two or more identical batteries in series. For example putting 4 identical 12V 100Ah batteries (1200Wh each) in series makes a 48V 100Ah battery bank. (4800Wh.) When in series, the voltages add and Amps or Amp hours stay the same.
Note that most Lithium Iron Phosphate batteries should not be put in series due to the way their internal BMS electronics work. Instead you need to buy batteries designed for the voltage your inverter needs. Battle Born LFP batteries are an exception and can be put in series.
Connecting Batteries in parallel raises the amperage capacity
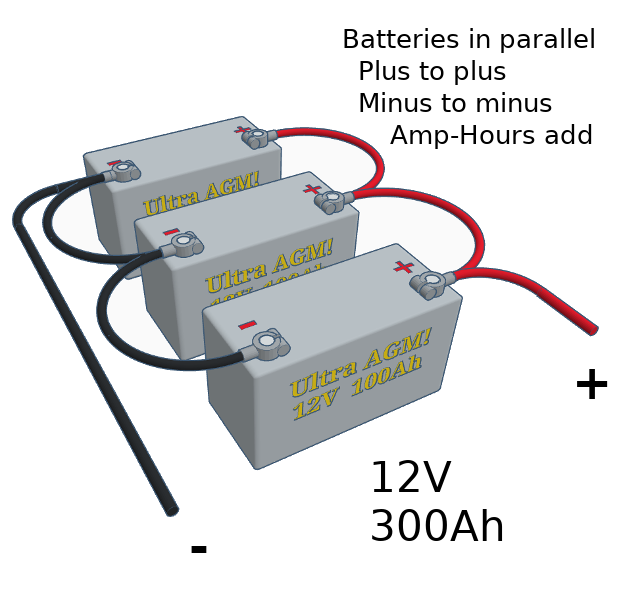
Putting two or more identical batteries in parallel splits the amperage and amp-hours between them while keeping the same voltage. For example putting 3 identical 12V 100Ah batteries (1200Wh each) in parallel makes a 12V 300Ah battery bank. (3600Wh.) When in parallel, the voltage remains constant and amps and amp hours add up. This is how most people wire up their 12V systems, using multiple 12V batteries in parallel. But there are important limitations you should know about.
- You shouldn’t mix smaller batteries with larger ones, nor should you mix different brands; they must be identical
- 3 batteries in parallel (or 3 strings in parallel) is the limit recommended by most lead-acid battery manufacturers. Some Lithium batteries can do more than 3.
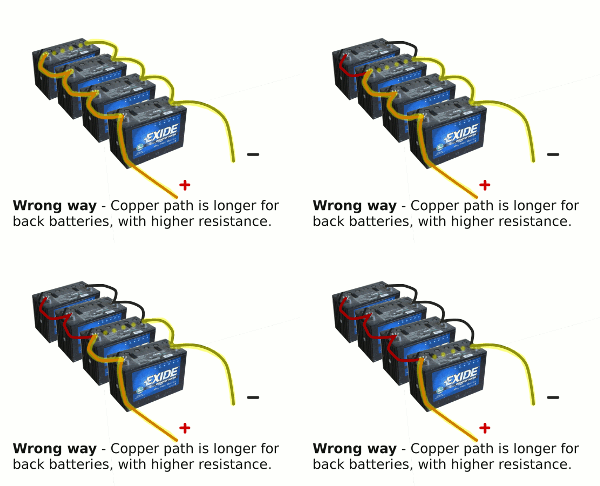
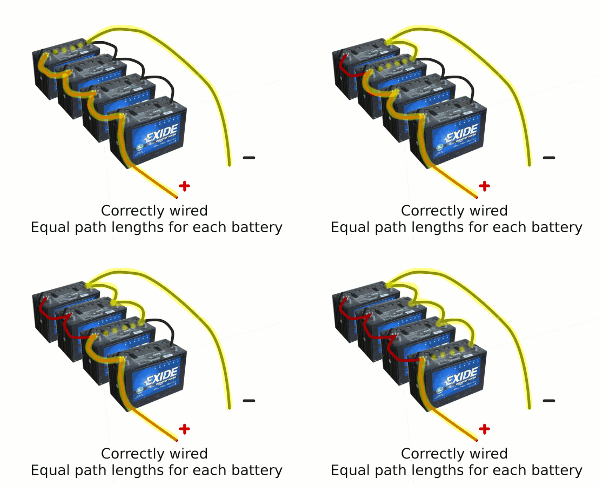
- You must keep the wire gauge and path lengths the same for all batteries
The above limitations are important to follow because variations from one battery to the next cause the current to not distribute equally. Over repeated charge/discharge cycles the differences add up and wear out batteries before their time. Even worse, once you’ve got a weak battery, it can suck the life out of the others and make the whole bank perform worse than if it wasn’t there at all. Sticking with 3 parallel strings minimizes the problem, but a single string is best.
Series-Parallel Arrangements
When doing both series and parallel, do not cross connect the batteries in the middle of the series strings. Only connect at the top and bottom of the strings.

Proper Cabling Practice is important to keep your batteries in balance
The wiring harness should give each battery the same length of cable of identical size and the same number of connectors to go through. If you wire your batteries in parallel the way it’s shown on most schematics and on many websites, it is electrically correct, but the resistance is unequal to the different batteries. The Batteries with the shorter cable length will carry more of the load and wear out faster.
Top Off Each Battery Before Physical assembly!
Before assembling multiple batteries into a battery bank it is very important to get all the individual batteries to the same charge level. That way none of them will be overcharged while the others “catch up.” Fully charge all batteries individually first, then hook them together. If you don’t have an AC charger available you probably can use the charge controller you’ve got and a couple panels rigged up to charge one battery at a time.
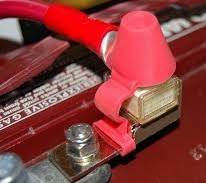
For safety, put a fuse on each series string to prevent burns or fires if you accidentally touch the wrong wires together. Big batteries can melt thick copper wires in seconds! We highly recommend MRBF terminal fuses and mounting blocks since they are simple to bolt directly onto most batteries, relatively inexpensive and can interrupt huge currents.
Why 48V is better
If you stick with a 12V inverter and locally available 12V lead-acid batteries, you are severely limiting your system size. Typically the largest 12V batteries you’ll find weigh about 60kg and are rated 200Ah, but remember you can only use half that. Three of them in parallel make a battery bank with 3600Wh of usable capacity, enough to run a desktop computer and some lights, but not a whole lot more. Most folks just add 6 or 8 batteries in parallel and accept the short battery life and imbalance problems.
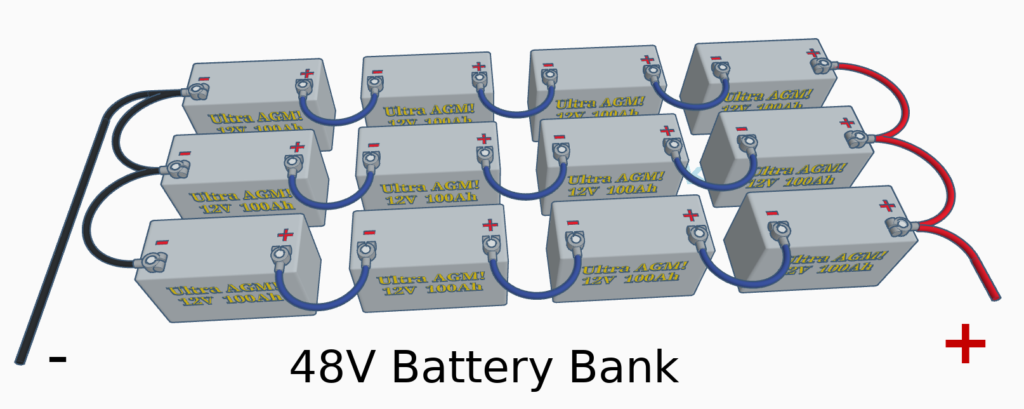
A 48V 300Ah Bank made of 12V 100Ah batteries
Using a 48V inverter allows you to build a bigger bank four times the size with 12 batteries while still following the 3 strings in parallel limitation. Batteries in series can have their own problems with the weak ones overcharging, so we recommend a battery balancer on each string to keep all your batteries happy.

A 48V system will use smaller wires and still have much lower resistance losses because the amperage is much lower. For even larger capacity, use individual 2V cells of 800Ah or more allow for a much larger battery while still limiting to 3 or less strings.
LFP batteries have much lower internal resistances, but they can have the same problems with too many parallel strings. SimpliPhi requires you use equal length wires for each string tied to a large buss bar to keep the resistance as even as possible. (see image.) Discover LFP batteries deal with the problem by using a data connection between the Battery Management System (BMS) inside each battery and actively even out the load when they are in parallel.
Battery Cable Sizing
As a general rule, systems over 1000 watts should use 24 volt or 48 volt battery banks. This is because at higher power levels the cables required by a 12V system get extremely fat, making them both expensive and very hard to work with.
You may be asking yourself, “How do I figure out how big the wire is supposed to be?”, and “How far can I run it?” There are two considerations, safety, and power losses. Battery wire size is often driven by power loss in the wires. A good target to design to is 2% loss or less. If this sounds low, remember that the loss gets counted twice, when you’re charging the battery, and again when you discharge it. 2% loss means a voltage drop in the wires of:
0.24V for a 12V system
0.48V for a 24V system
0.96V for a 48V system
You need to know two other things:
- Maximum continuous current – which allows us to calculate the maximum allowable cable resistance.
- Total length of cables both (+) positive and (-) negative. Knowing the cable length, we can look up the cable size needed to stay below our resistance loss target.
Knowing the length and gauge of the cable you can calculate the resistance and multiply by the amperage to calculate the voltage drop. You also need to make sure the wire you choose will not overheat, degrading the insulation and becoming a safety hazard. If this all seems complicated, GTIS power systems can help you with those calculations. Just email us at power_systems@sil.org.
Look up tables
For starters, we’ve included the tables below which show the minimum practical cable sizes for a 5% loss with various systems. In most cases you should use cables a size or two larger to keep your losses closer to 2%, and you definitely don’t want to use anything smaller than the numbers in red, which could be hazardous. If you print the PDF on a full sheet of paper, the circles are the actual diameter of the copper in the cable, not including the insulation.

Also, Blue Sea Systems has a nice lookup chart for a variety of AWG wire lengths and amperages here: https://www.bluesea.com/resources/1437
Cable Sizing Summary
It is best practice to put the inverter and charge controller as close to the battery bank as practically possible. The shorter the distance between them the better for reducing resistance in the wire, and a better possibility of using smaller wire sizes. It is important to know that you cannot use your smaller house wires for wiring the battery bank to your charge controller or inverter.
It is a good practice to use a multi-meter to check the voltage at the inverter and battery bank to see if you have a 2% voltage drop or less. This will also show if you have any loss because of a bad connection(s) on your battery bank terminal(s).
If your wires are not sized properly they can create too high of resistance and waste your expensive power as heat. Undersized wires can be a fire hazard, risking your lives and property. Play it safe and figure out what size wires will be best and contact us if you need help. You can reach us at power_systems@sil.org.
