 GTIS Power and Communications Systems
Important Concepts:
- Solar panels are rated in watts at standard test conditions, which unfortunately, are better than the conditions were you live. In tropical or temperate zones expect only about 85% of their rated watts at noontime on a very good day. Even less in the mornings and afternoons.
- For small 12-V solar systems using a simple charge controller, not MPPT, the panels need to be matched for 12-V batteries. Open Circuit Voltage of the Panel (Abbreviated Voc) should be about 19 V to 21 V. This is the highest voltage the panel will produce when there is no load; the ideal voltage to use them at will be about 80% of Voc, but you don’t need to worry about that.
- If funding is tight, buying more solar panels with not-enough batteries will be better than buying more batteries with not enough panels. Don’t skimp on panels.
Types of Panels
Unless you’re really limited on roof space you needn’t worry about the efficiency of you panels nor if they are monocrystalline or polycrystalline or thin film. More important are the form-factor, weight, ruggedness and cost per watt.
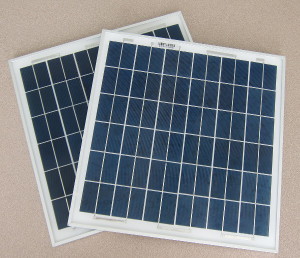 The cheapest-per-watt panels are glass covered with an aluminum frame. We call this “traditional style.” They can be easily ruined in transport or by a tossed rock, and are surprisingly heavy. If you don’t damage them, they’ll last over 20 years on your rooftop. Larger sizes are the cheapest per watt, and these are sold everywhere.
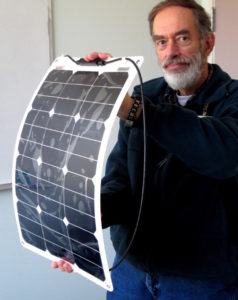 Much lighter and more rugged are “Semi-flexible” panels made by mounting thin silicon wafers on plastic backing with a clear plastic facing. These can be stepped on and whacked about quite a bit without breaking. The 100-W and 30-W sizes we carry can be checked in baggage on an airline. Transport in canoes or by motorcycle is feasible. Their higher cost-per watt may be worth it to reduce your shipping cost and trouble. They might deteriorate faster than glass covered panels; we haven’t had any for 20 years.
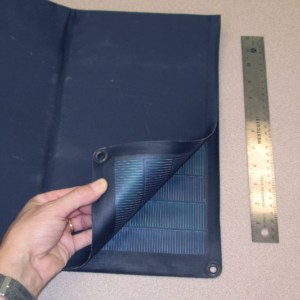 Thin-film solar panels are generally of interest only for small portable systems. They can be extremely lightweight and rugged with only a cloth or thin plastic backing, but they can be left out in the weather for years and hold up well. Pricing is around $10 per watt so you need deep pockets. Competing with them are very small “traditional style” panels in canvas cases that can be folded up. These are heavier and more fragile, and aren’t suitable to be left out continuously on the weather. We used to stock rollable thin-film panels with stainless steel backing, but only have a couple left since they went out of production.
Design Considerations
 The important factor is how many watt hours your panels will produce on a average day at your location. Most tropical locations that aren’t exceptionally cloudy can estimate the daily watt-hours out of a panel by this rule of thumb:
Multiply the panel rating in watts x 4. Expect a 100 W panel to produce ~ 400 watthours on a reasonably good day.
You need to oversize your panels so that on a nice day that comes after a few cloudy days in a row you can have enough energy to not only run all your loads, but at the same time charge your depleted batteries. A good rule is to design your panels for 3 X your estimated daily loads.
Example: My load estimate says I’ll need 1400 watt-hours each day. Triple this…
1400 Wh X 3 = 4200 Wh
So I need panels to produce 4200 Wh on a good day.
The panels I’ve decided to buy are rated 160 W, how many do I need?
The other rule above says I can estimate Wh out of each panel as four times the panel rating 160 W X 4 h = 640 Wh each panel
4200 Wh ÷ 640 Wh = 6.5625 panels — 6 or 7 panels rated 160 W each should do nicely.
If you’re using a MPPT charge controller the solar panels can be connected in series on the roof and you can have a single pair of 10 AWG wires for every 4 or 6 panels, sometimes more. See the charge controller page for design considerations.
For 12-V systems with non-MPPT charge controllers, you’ll want to run a pair of 12 or 10 AWG wires from each panel to a combiner box and breaker/disconnect right next to your charge controller. You need lots of copper to avoid loosing too much power in the wiring.
Pointing the panels
The rules of thumb above are rough and assume you’re going to point your panels in approximately the optimum direction, which is basically where the sun appears at noon in September and March. Start at the zenith (panel is horizontal like a table top), then tilt the panel down from the zenith towards north or south the same number of degrees as your latitude. (Example if you’re at 25 deg north latitude, point them 25 degrees due south of straight up.) If you have a certain season of the year when it’s particularly cloudy, you may want to optimize the panels for that season and even point the panels a bit west if it’s usually cloudy in the morning and clear in the afternoons. If you’re near the equator you want to mount them with at least 10 degrees of tilt so the rain will run off nicely and take the dust buildup with it. A 10 degree “error” will have almost no effect on power output.
Sometimes there are reasons you can’t mount the solar panels facing the “optimum” direction. Our SILT online tool can show you the effect of pointing your panels in different direction and accurately predict the panel output for your location for any month of the year.
Clean Your Panels
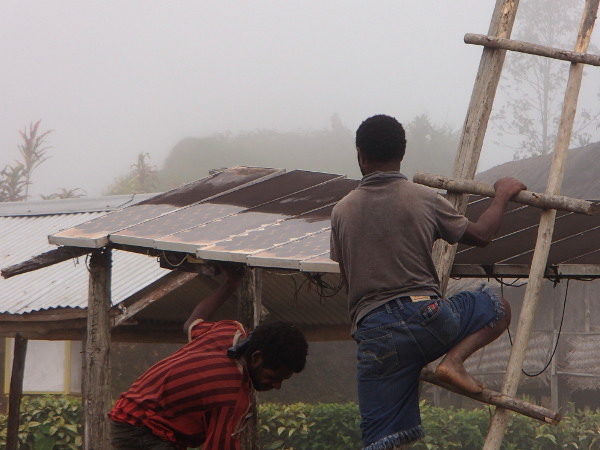
If you can see that there’s dirt on the panels it’s time to clean them. These guys had no power at all until they cleaned them! The sunshine hitting dirt doesn’t generate electricity. Regularly check and clean the panels with water and a soft brush or rag and use soap if needed.